Activity and Its Lifecycle In Android Tutorial:
Last Updated on: 27th Dec 2024 17:57:15 PM
Activity in Android is one of the most important components of Android. It is the Activity where we put the UI of our application. So, if you are new to Android development then you should learn what an Activity is in Android and what is the lifecycle of an Activity. In this page we will learn about Activity and its lifecycle. So, let's get started.
What is an Activity in Android ?
Activity is a class that is resposible to create a window to draw the UI of your application. in other word we can say Activity is one screen of the app's user interface. and activity has series of methods which runs in an activity.
Activity lifecycle in Android ?
Every Activity has deffirent states like creating, stopping, or resuming etc . This deffrent states are called as Activity Life Cycle in Android.
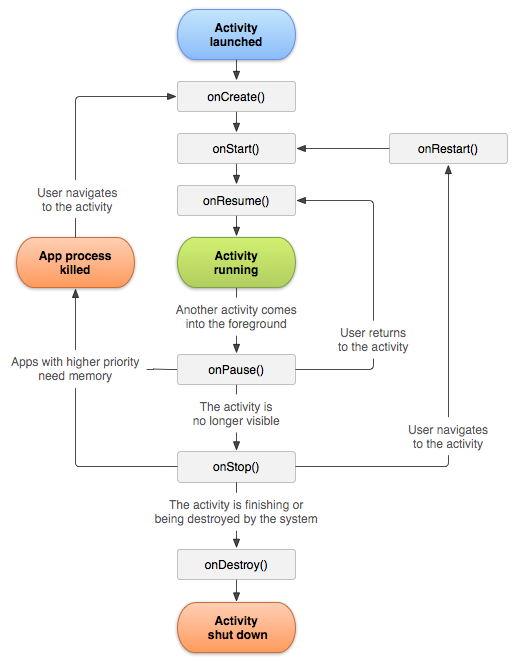
Activity lifecycle has seven callback methods
- onCreate()
- onStart()
- onResume()
- onPause()
- onStop()
- onRestart()
- onDestroy()
The following diagram shows the whole Activity lifecycle:

Let's See the description of Activity Lifecycle in android :
| Method Description | |
|---|---|
| onCreate() | Called when the activity is first created |
| onStart() | Called just after it’s creation or by restart method after onStop(). Here Activity start becoming visible to user |
| onResume() | Called when Activity is visible to user and user can interact with it |
| onPause() | Called when Activity content is not visible because user resume previous activity |
| onStop( ) | Called when activity is not visible to user because some other activity takes place of it |
| onRestart() | Called when user comes on screen or resume the activity which was stopped |
| onDestroy() | Called when Activity is not in background |
Go to One Activity to fragment
Example : fragment transaction (open Activity to fragment)
Step 1 : Create a new project
Step 2 : design a xml file (activity_main.xml)
<?xml version="1.0" encoding="utf-8"?>
<LinearLayout xmlns:android="http://schemas.android.com/apk/res/android"
    xmlns:app="http://schemas.android.com/apk/res-auto"
    xmlns:tools="http://schemas.android.com/tools"
    android:layout_width="match_parent"
    android:layout_height="match_parent"
    android:gravity="center"
    android:orientation="vertical"
    android:id="@+id/container"
    tools:context=".MainActivity">


    <Button
        android:layout_width="match_parent"
        android:layout_height="wrap_content"
        android:id="@+id/btn_go"
        android:layout_gravity="center"
        android:text="go to fragment "
        ></Button>

</LinearLayout>
Step 3 create a blank fragment in your project (Myfragment.java)
new=>fragment=>fragment(blank)
Step 4 design a xml file of fragment (fragment_myfragment.xml)
<?xml version="1.0" encoding="utf-8"?>
<RelativeLayout xmlns:android="http://schemas.android.com/apk/res/android"
    xmlns:tools="http://schemas.android.com/tools"
    android:layout_width="match_parent"
    android:background="#F40B0B"
    android:layout_height="match_parent"
    tools:context=".Myfragment">


    <TextView
        android:layout_width="match_parent"
        android:layout_height="wrap_parent"
        android:text="welcome to Fragment"
        android:textSize="20dp"
        android:textStyle="bold"
        android:layout_centerInParent="true"
        android:textAlignment="center"
        android:textColor="@color/white"
        android:gravity="center"/>

</RelativeLayout>
Step 5 remove some code in (Myfragment.java)should be look like this
package com.example.fragmentexample;

import android.os.Bundle;

import androidx.fragment.app.Fragment;

import android.view.LayoutInflater;
import android.view.View;
import android.view.ViewGroup;

public class Myfragment extends Fragment {


    @Override
    public View onCreateView(LayoutInflater inflater, ViewGroup container,
                             Bundle savedInstanceState) {
        // Inflate the layout for this fragment
        return inflater.inflate(R.layout.fragment_myfragment, container, false);
    }
}
Step 5 coding of (Mainactivity.java)
package com.example.fragmentexample;

import androidx.appcompat.app.AppCompatActivity;
import androidx.fragment.app.Fragment;
import androidx.fragment.app.FragmentTransaction;

import android.os.Bundle;
import android.view.View;
import android.widget.Button;
import android.widget.Toast;

public class MainActivity extends AppCompatActivity {
Button btn_go;
    @Override
    protected void onCreate(Bundle savedInstanceState) {
        super.onCreate(savedInstanceState);
        setContentView(R.layout.activity_main);
        btn_go=findViewById(R.id.btn_go);
        btn_go.setOnClickListener(new View.OnClickListener() {
            @Override
            public void onClick(View view) {

                btn_go.setVisibility(View.GONE);
                Fragment fragment = new Myfragment();
                FragmentTransaction fragmentTransaction = getSupportFragmentManager().beginTransaction();

                fragmentTransaction.replace(R.id.container,fragment).commit();

            }
        });
    }
}
now go to Fragment to Another fragment
Step 1 create a another fragment in project
Step 2 design xml file of another fragment
<?xml version="1.0" encoding="utf-8"?>
<RelativeLayout xmlns:android="http://schemas.android.com/apk/res/android"
    xmlns:tools="http://schemas.android.com/tools"
    android:layout_width="match_parent"
    android:background="#126C64"
    android:layout_height="match_parent"
    tools:context=".Myfragment">


    <TextView
        android:layout_width="match_parent"
        android:layout_height="match_parent"
        android:text="welcome to next Fragment"
        android:textSize="20dp"
        android:textStyle="bold"
        android:layout_centerInParent="true"
        android:textAlignment="center"
        android:textColor="@color/white"
        android:gravity="center"/>

</RelativeLayout>
Step 3 and design a button also in first fragment (fragment_nextfragment.xml)
<?xml version="1.0" encoding="utf-8"?>
<RelativeLayout xmlns:android="http://schemas.android.com/apk/res/android"
    xmlns:tools="http://schemas.android.com/tools"
    android:layout_width="match_parent"
    android:background="#F40B0B"
    android:layout_height="match_parent"
    tools:context=".Myfragment">


    <TextView
        android:layout_width="match_parent"
        android:layout_height="wrap_content"
        android:text="welcome to Fragment"
        android:textSize="20dp"
        android:textStyle="bold"
        android:id="@+id/tv"
        android:layout_centerInParent="true"
        android:textAlignment="center"
        android:textColor="@color/white"
        android:gravity="center"/>
    <Button
        android:layout_below="@+id/tv"
        android:layout_width="match_parent"
        android:layout_height="wrap_content"
        android:id="@+id/btn_next"
         android:layout_marginHorizontal="40dp"
        android:text="go to fragment "
        ></Button>


</RelativeLayout>
Step 4 . coding of (Myfragment.java)
package com.example.fragmentexample;

import android.os.Bundle;

import androidx.fragment.app.Fragment;
import androidx.fragment.app.FragmentTransaction;

import android.view.LayoutInflater;
import android.view.View;
import android.view.ViewGroup;
import android.widget.Button;

public class Myfragment extends Fragment {

    Button btn_next;

    @Override
    public View onCreateView(LayoutInflater inflater, ViewGroup container,
                             Bundle savedInstanceState) {
        // Inflate the layout for this fragment
        View view = inflater.inflate(R.layout.fragment_myfragment, container, false);

        btn_next=view.findViewById(R.id.btn_next);
        btn_next.setOnClickListener(new View.OnClickListener() {
            @Override
            public void onClick(View view) {

                Fragment fragment = new Nextfragment();
                FragmentTransaction fragmentTransaction= getActivity().getSupportFragmentManager().beginTransaction();
                fragmentTransaction.replace(R.id.container,fragment).commit();
            }
        });

        return  view;
    }
}
backstack implementation in fragment
addToBackStack method on FragmentTransaction before calling commit. This way, when user clicks back button, it takes the user back through history of fragments.
fragmentTransaction.addToBackStack(null);